Unit 4 (Chapters 7,8,&9): Geometry
Note: This unit is actually 3 geometry units put together, combined with an introduction to some 8th grade Math Geometry concepts.
Part 1: Angles and Polygons
Intro to polygons
Click here to see examples of polygons that we will discuss
Below you will see all of the vocab that we discussed in class (Most of which should be review).

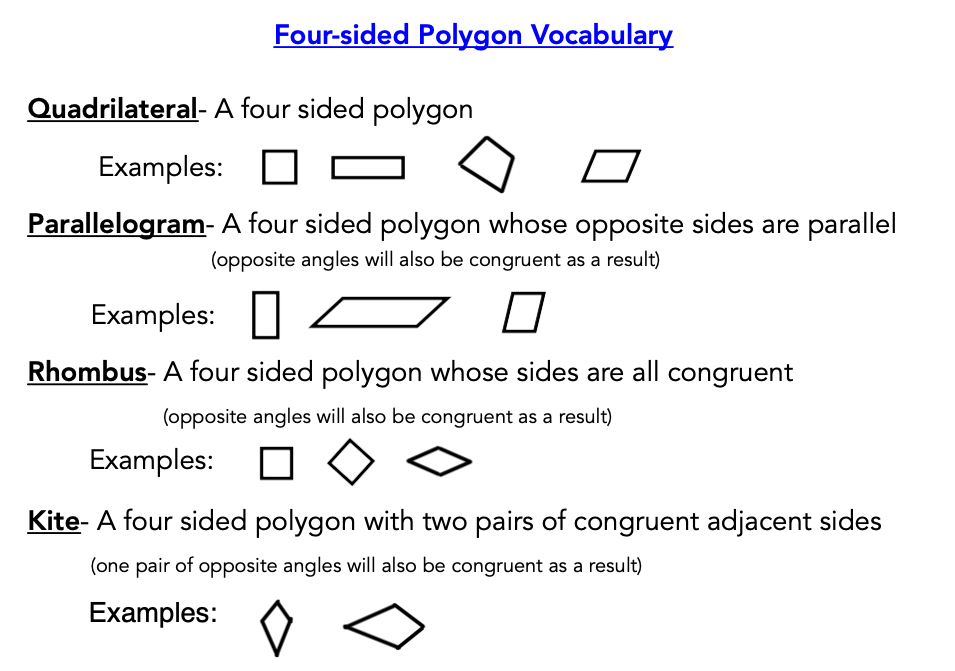
Identifying Polygons
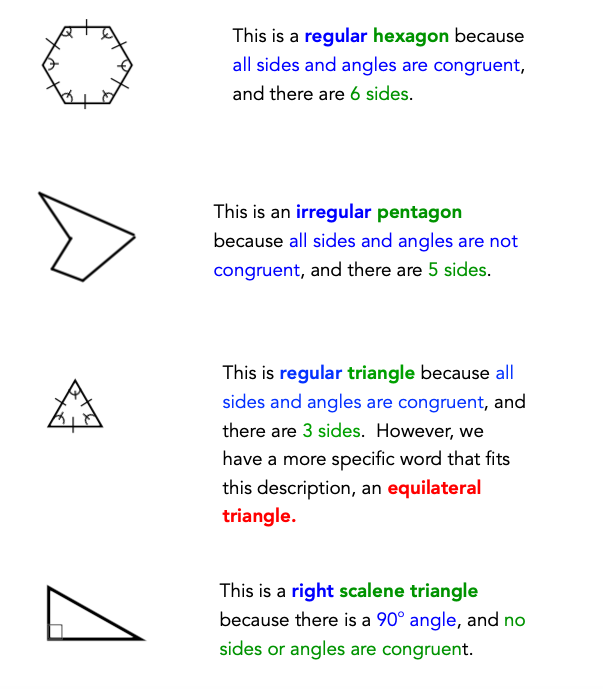
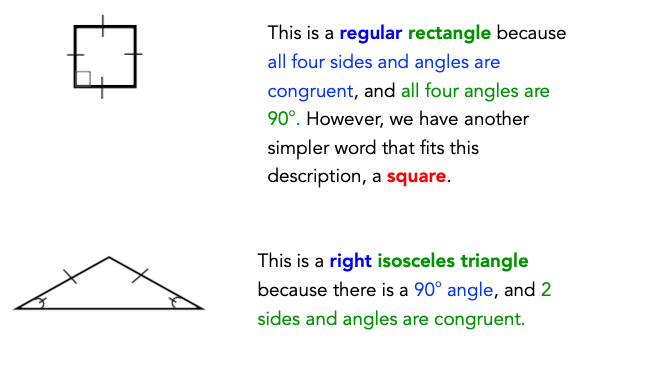
After we are reminded of some of the vocabulary that we have known for years (acute, equilateral, obtuse, etc...) we can begin to properly label or identify polygons. Essentially, you are naming each polygon in the most specific way possible.
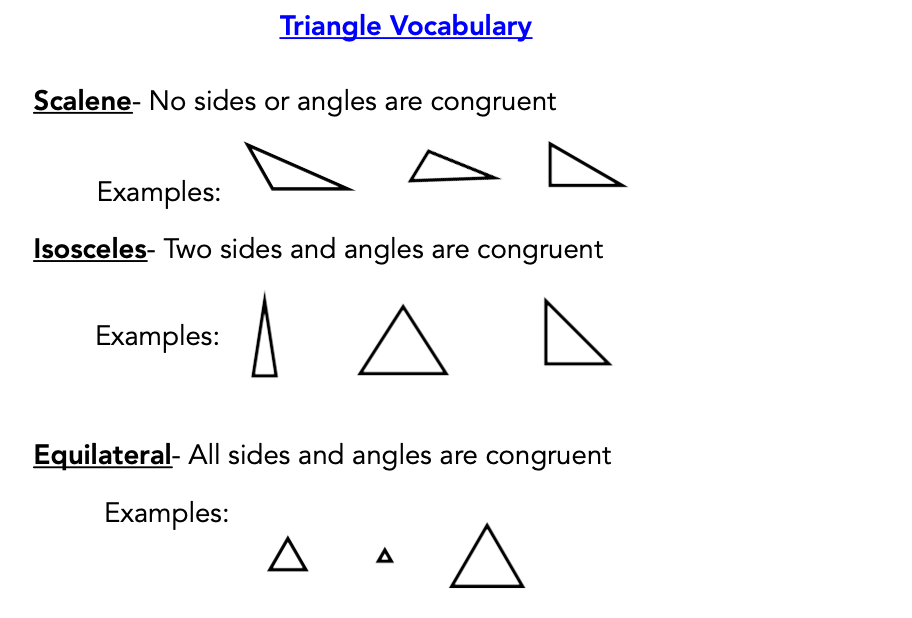
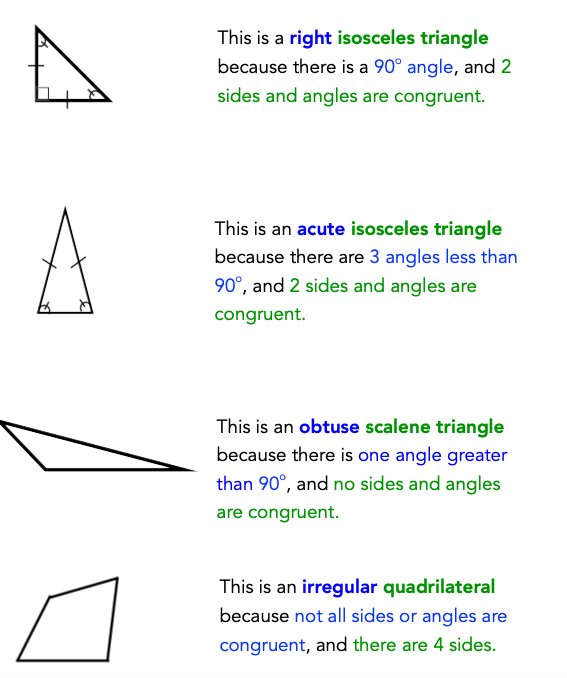
Take a look at the examples below. Take note that we do not use regular or irregular when identifying triangles because we have more specific vocabulary (like isosceles and scalene). Also, when identifying triangles we use one descriptor for the angles (sort of like an adjective), and one for the type of triangle. For example, it is not enough to simply say "this is an isosceles triangle". There are actually three types of isosceles triangles, right isosceles, acute isosceles, and obtuse isosceles.
Take a look at the examples below. Take note that we do not use regular or irregular when identifying triangles because we have more specific vocabulary (like isosceles and scalene). Also, when identifying triangles we use one descriptor for the angles (sort of like an adjective), and one for the type of triangle. For example, it is not enough to simply say "this is an isosceles triangle". There are actually three types of isosceles triangles, right isosceles, acute isosceles, and obtuse isosceles.
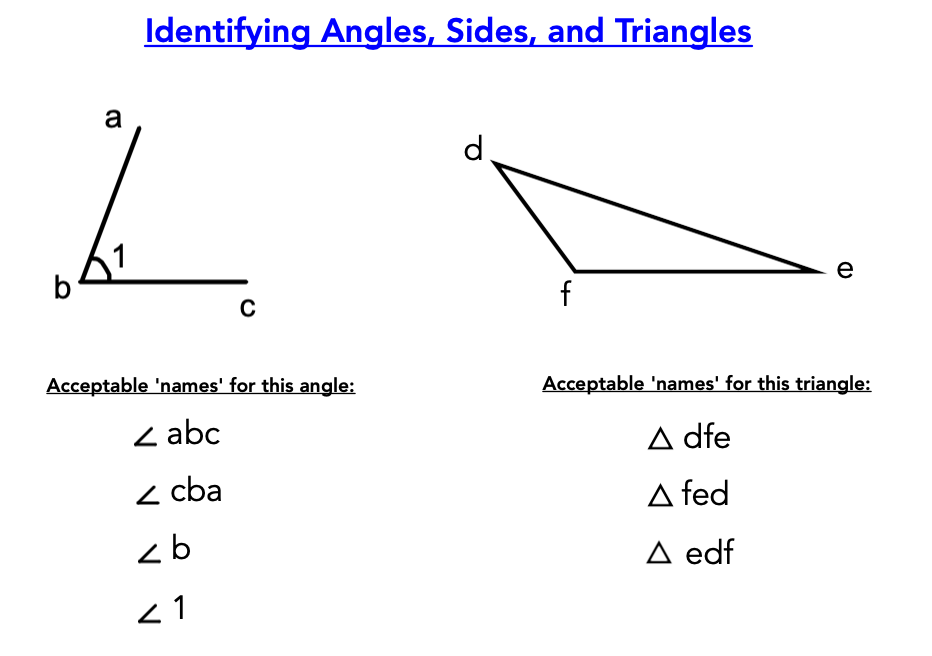
Identifying Angles
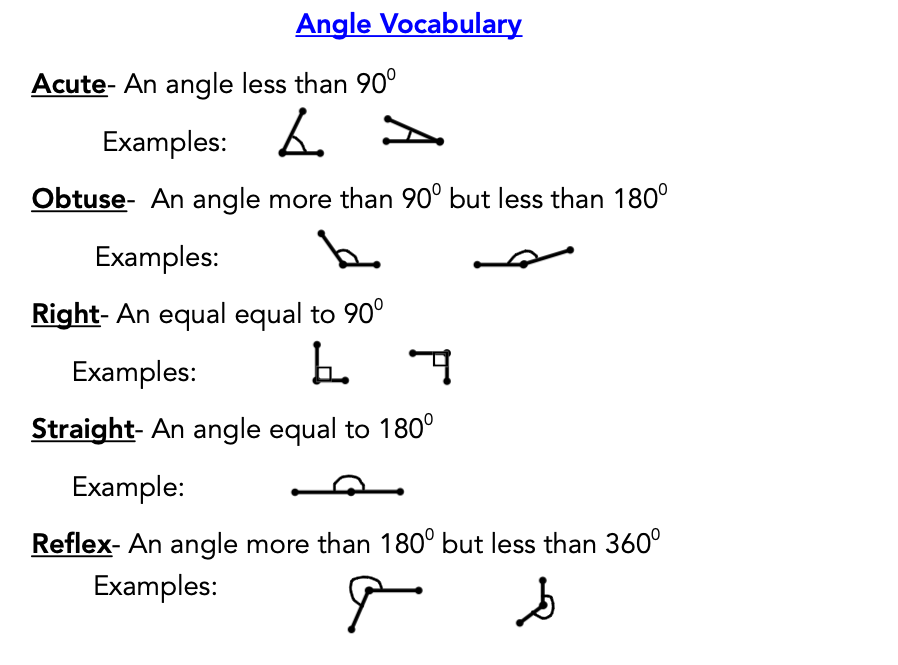
Below you will find the different symbols and vocab that we discussed in class.
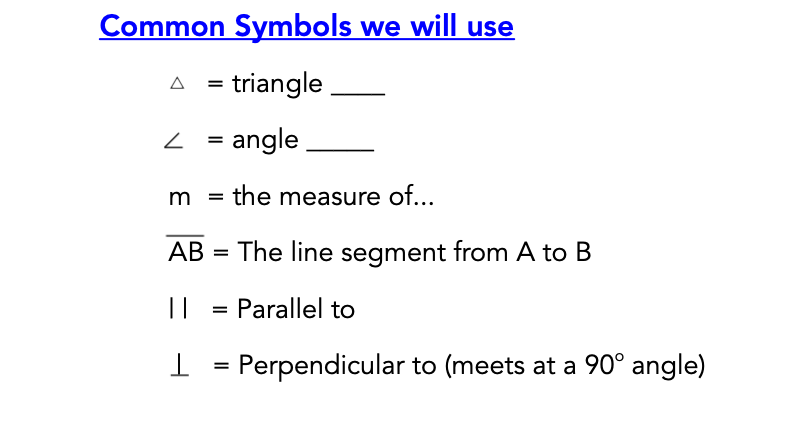
Using these symbols, we can identify or label things like triangles and angles. Eventually we will also use these symbols to identify angles within other polygons and lines.
Protractor use
Some of us may be familiar with how to use a protractor, others not so much. Either way, we need to review this skill before moving on. Please watch the video below if you are still a little hazy on your protractor skills.
I apologize for the fuzzy quality of the video, it is not mine. :)
I apologize for the fuzzy quality of the video, it is not mine. :)
Triangle Construction
Now that we are familiar with both polygons and protractor use we will spend a couple of days constructing triangles. In this section I want you to think about triangle construction as a way to not only test our vocabulary and sketching skills, but also as our logic and reasoning skills.
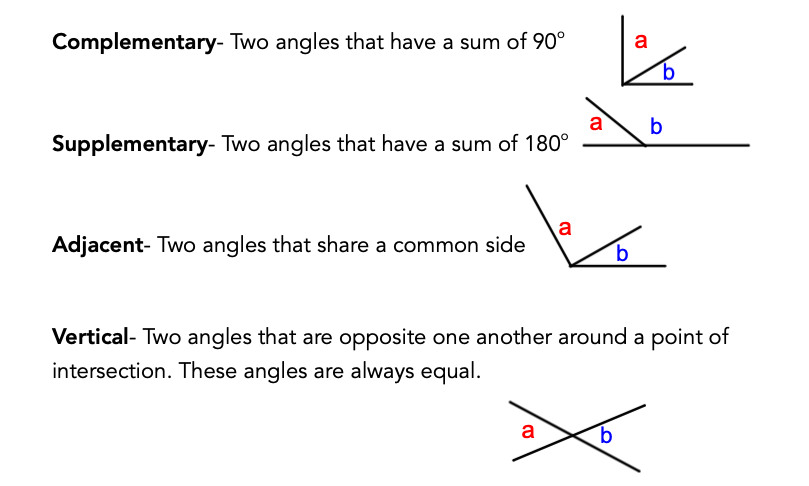
Complementary, Supplementary, Vertical, and Adjacent Angles
Watch the videos below to see these new angle concepts. Or, scroll further down to see the definitions we discussed in class.
Parallel Lines and Transversals
This is an introduction to the concepts of parallel lines and lines that intersect them (transversals). Watch the short video below to see this concept in action:
Part 2: 2D figures
Perimeter and Area of rectangles and Triangles
Introduction to circles (Circumference, Diameter, Radius, Pi)
Next on our list of geometric figures is the circle. When drawing a circle there are a few observable dimensions that we can talk about, the perimeter of the circle and the width across the circle.
Watch the video below for the correct mathematical terminology that we will use:
Watch the video below for the correct mathematical terminology that we will use:
Area of a circle
Finding the area of a circle is one of the "bigger ideas" that we investigate in 7th grade. As such, there are a number of different ways of deriving, discovering, and proving the area of a circle. Each of the methods that we will discuss are found below. My suggestion is to watch each and decide for yourself which method makes the most sense to you. This is the method that your brain will refer back to when trying to recall the formula.
*Note* the video below is the algebraic method. It is very tricky!! Be aware that my main focus for teaching area of a circle are the videos above.
Perimeter of Composite Figures
Geometric Odds and Probability
Think of Geometric odds and probability as the odds of hitting a bullseye on a dart board. If the bullseye takes up 10% of the entire board, then theoretically you have a 10% chance of hitting a bullseye. In terms of area, if the total board is 80 square inches and the bullseye is 8 square inches, then we would say that we have an 8 out of 80 chance (which is 10%). Watch the video below for an example (This is not my video).
Similar Figures
Applications of Similar Figures
Coordinate Grid Transformations (with similar figures)
Part 3 - Three Dimensional Figures
Classifying 3D figures (Prisms vs. Pyramids)
Generally speaking, in 7th grade we will be discussing three types of 3d figures, prisms, pyramids, and composite solids.
Watch the video below on how to differentiate between prisms and pyramids.
Watch the video below on how to differentiate between prisms and pyramids.
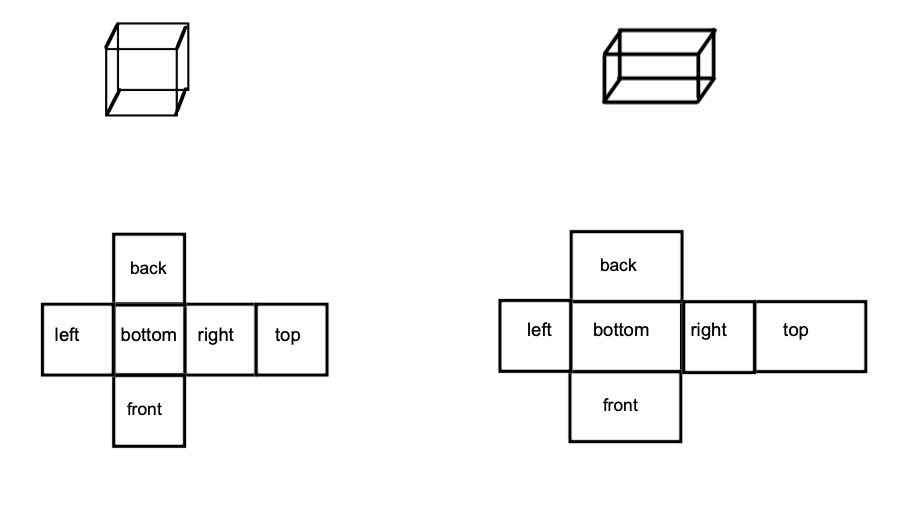
Drawing Nets
A geometric net is a two dimensional drawing of the outside surfaces of a 3d figure. For a simple example, imagine unfolding a cereal box so that you could see all of the faces of the box. It might look something like this:

A net allows us to see all of the faces, therefore, we are able to draw and use nets when we are trying to calculate the area of the entire outside surface of a 3d figure (more on that later...).
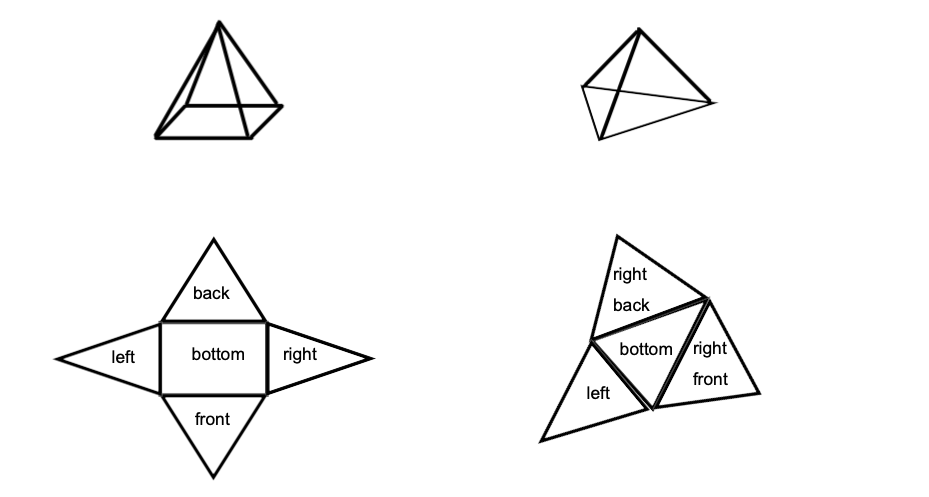
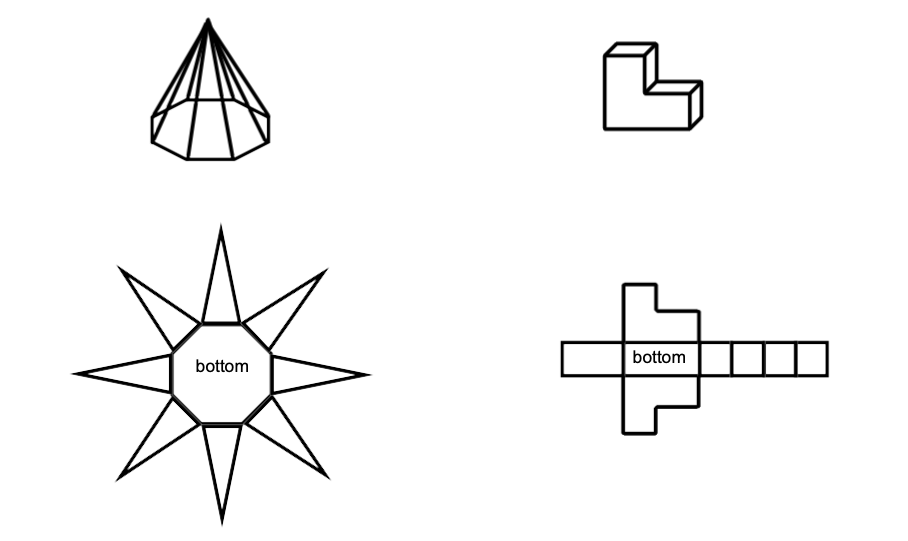
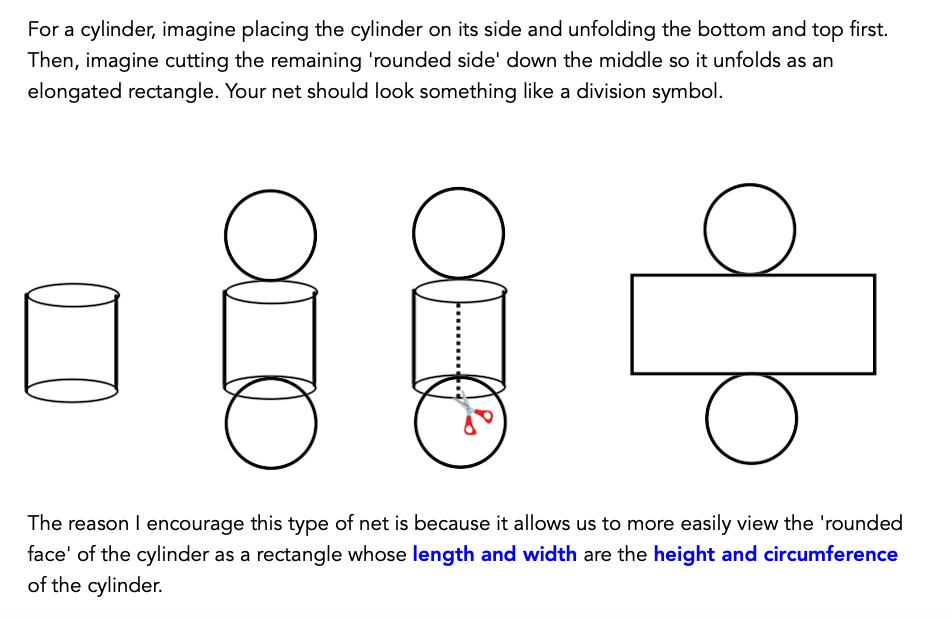
When drawing nets, you need to take extra care to ensure that your 'net' could be folded back up to create the figure you intend to represent. For example, here are a few examples of nets for some common 3d figures:
***please note**** the examples below are one of many different ways to sketch each net. The general rule to follow is to imagine folding the figure back together again, if the net would create the figure, then it is correct.
Surface Area
The surface area of a 3d figure is the total area of all of the outside surfaces. For example, if you were wrapping a box with wrapping paper it would be helpful to know how many square inches of paper would be needed. You might first start by calculating the surface area.
Because there are infinitely many types of 3d figures, there is no 'one size fits all' method. However, please be aware that although there are a lot of "formulas" online for calculating surface area, we will not be using them. My focus is on the concept of surface area itself. Using the main concept, we can confidently calculate the surface of most any 3d figure.
Because there are infinitely many types of 3d figures, there is no 'one size fits all' method. However, please be aware that although there are a lot of "formulas" online for calculating surface area, we will not be using them. My focus is on the concept of surface area itself. Using the main concept, we can confidently calculate the surface of most any 3d figure.
Volume of Prisms and Pyramids
Since there are an infinite number of different types of prisms that can be created, and an equally infinite number of pyramids, there are many MANY formulas that you could potentially learn and create. Therefore, my focus is not each formula, but on the concept of volume itself. By understanding the general concept around volume with prisms and pyramids, you can potentially create, at will, any formula you desire. Also, it allows you to find volume for irregular or composite prisms and pyramids that don't necessarily have a 'formula'.
Cross sections of 3D figures
In this lesson we experiment with 'slicing' three dimensional figures. Specifically, we examine the faces that we can create when we slice pieces off of a 3D figure.In math terms, we call this process examining 'cross sections', or the intersection of a solid figure with a coordinate 'plane'.
